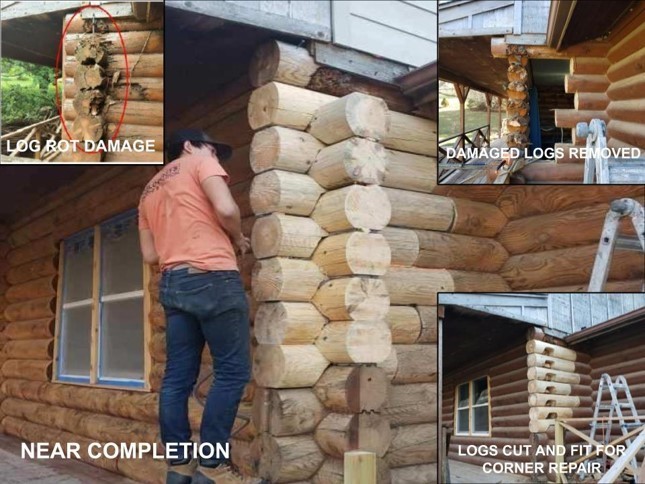
Suspect log rot, what’s next? First examine your logs for obvious signs of rot (darkened areas, insect holes, large checks, etc.), then with a hard tool tap on your log and listen for hollow, drum-like sounds. There are several videos available to help you further identify rot. If 30% or more of the log has log rot (or less if in a structural support area), it’s better to replace then to repair the damaged area(s). At this point the structural integrity of the home can be compromised and it is important to move ahead, quickly, with a plan to replace the rotted log(s). Make sure to contact an experienced, reputable, and licensed log home renovation professional.
If, however, you just have the beginnings of a log rot problem (i.e. a soft spot in the log) consider the below treatments:
Instructions:
1. Dry Wood Out
Let the wood completely dry out. Exterior wood can sometimes take weeks during the dry season to dry out. It helps to cover the wood with clear sheet plastic, elevating the plastic from the rotten section to promote airflow.
2. Remove Rot
Removing the rot will help accelerate the drying process. Use a screwdriver, paint scraper, or five-in-one tool to carve out the rotted wood until you are to a solid area of the log. All loose and unstable wood must be removed. If the wood still needs to dry out, let it dry naturally or carefully use a heat gun to dry out damp areas. Add borate at this point.
3. Mix Consolidant
In a plastic container, mix the two liquids with a wooden stick. Use a chip brush to brush the consolidant onto the wood. Apply heavily. The consolidant has about 30 minutes of working time.
If the wood is heavily cracked or pitted, you can pour the consolidant into those deep voids.
4. Let Consolidant Harden
Let the consolidant cure for about two or three hours. In colder temperatures, it may take longer for the consolidant to harden.
5. Mix Filler
Epoxy filler consists of two parts (often called Part A and Part B) that harden when mixed. Wearing latex gloves, mix the two parts in a clean plastic container.
6. Apply Filler
Using an application tool, generously apply the mixed filler to the missing wood area. Push the filler in firmly. Roughly sculpt the filler to the shape of the missing section. Make the shape slightly larger than the original. Add additional wood pieces and backer rod if needed.
7. Sand Down
Let the filler/epoxy harden for at least four hours. With rough, #100 sandpaper on the sander or sanding block, sand down the filler to the size of the original windowsill.
8. Smooth it out
Switch to #220 sandpaper. Continue to sand down until it is completely smooth.
9. Stain Filler and Wood
Use a stain that won’t crack and that will protect the wood underneath to prevent moisture infiltration, UV damage, and frequent re-staining
Obviously, addressing the issue that caused the damage is paramount to ensure future issues don’t arise. Here are some common conditions that promote log rot:
- Leaky gutter or down spout that allows water to run down the logs
- Large check or crack on the up-facing part of the log that collects and holds rainwater
- Garden sprinkler system that sprays the walls of the house
- Horizontal beam/log surface that allows water to sit on the surface and be wicked back into the house
- Log ends or ridge beam that extend past the protection of the roof
- Vegetation or flower boxes holding moisture next to the walls
- Earth in contact with log
- Porch attached to the bottom log instead of spaced properly to allow for water drainage
- Interior leaking plumbing
- Exterior faucets that are drilled through logs
- Paint used on the logs instead of a quality log home finish/stain
Some of these fixes are easy and some may require a professional but it’s very important to make sure the conditions that promoted the rot in the first place are corrected before you try to restore your logs. The team at 888 Log Guys is here to help with the repair or replacement of the rot on your logs… and so much more.


